The Cybernetic Compost - Building an Arduino-Monitored Vermicomposting Loop
Series: Closed-Loop Systems | Difficulty: Advanced | Estimated Time: 2 Hours (Build) + Continuous Operation
Introduction
A true closed-loop system leaves no waste. In nature, the decomposition of organic matter is the engine that drives new growth. However, domestic composting often fails because it is treated as a passive trash can rather than an active biological reactor.
In this module, we are building a highly efficient, macro-biological processing engine using Eisenia fetida (Red Wiggler worms). More importantly, we are giving this biological system a digital nervous system. By integrating an Arduino Uno and environmental sensors, we can track the exact thermodynamic and moisture thresholds of our compost, ensuring optimal conditions for rapid organic breakdown.
You are not just throwing away vegetable scraps; you are engineering a cybernetic feedback loop where data dictates biological efficiency.
The Biology & Thermodynamics: The Engine of Decomposition
Vermicomposting relies on a symbiotic relationship between worms and a vast microbiome of aerobic bacteria and fungi. The worms do not actually eat your food scraps; they eat the microbes that are breaking down the food scraps.
To keep this biological engine running at peak efficiency, three parameters must be tightly controlled:
The Carbon-to-Nitrogen (C:N) Ratio: The microbes require carbon for energy and nitrogen for protein synthesis. The ideal ratio is roughly 25:1. "Browns" (cardboard, paper) provide carbon. "Greens" (coffee grounds, vegetable scraps) provide nitrogen.
Moisture (60% - 80%): Worms breathe through their skin via osmosis. If the substrate is too dry, they suffocate. If it is too wet (anaerobic), oxygen is displaced, killing the aerobic bacteria and causing the bin to rot and produce foul-smelling hydrogen sulfide and ammonia.
Temperature (55°F - 77°F / 13°C - 25°C): Decomposition is an exothermic reaction (it releases heat). However, in a micro-loop like a domestic bin, extreme ambient temperatures can stall the system. If it drops below 55°F, the worms enter diapause (hibernation). Above 85°F, they will attempt to flee the bin or die.
Our microcontroller setup will continuously monitor moisture and temperature, providing the exact data needed to adjust the C:N inputs and ventilation.
Safety Framework: R.A.M.P.
Integrating live electronics with a moist biological environment requires careful physical architecture.
Recognize hazards: The primary hazard is electrical shorting caused by water contacting the microcontroller or power supply.
Assess risks: Low-voltage (5V/12V) DC components pose minimal shock risk to humans, but moisture can easily fry the Arduino board or corrode exposed sensor contacts.
Minimize risks: Use a capacitive soil moisture sensor rather than a resistive one to prevent galvanic corrosion. The Arduino board and breadboard must be mounted outside the composting chamber in an isolated, splash-proof housing. Ensure the temperature probe is fully waterproof.
Prepare for emergencies: If the electronic housing gets wet, instantly disconnect the main power source (battery pack or USB) before touching the components.
Materials & Equipment
The Biological Inputs:
The Processor: 1 lb of Eisenia fetida (Red Wigglers).
The Carbon Matrix (Bedding): Shredded, unbleached corrugated cardboard or coconut coir.
The Nitrogen Fuel: Kitchen scraps (coffee grounds, apple cores, leafy greens). Avoid meat, dairy, and heavy citrus.
The Vessel: Two opaque plastic storage totes (one fitting inside the other) with a lid.
The Hardware & Electronics:
Microcontroller: Arduino Uno R3 (or equivalent).
Temperature Sensor: DS18B20 Waterproof Digital Temperature Probe with a 4.7kΩ pull-up resistor.
Moisture Sensor: Capacitive Soil Moisture Sensor (v1.2 or similar).
Wiring: Solderless breadboard, assorted jumper wires.
Power: 9V battery adapter or a standard USB power bank.
The Procedure: Building the Cybernetic Loop
Phase 1: The Biological Architecture
Air and Drainage: Drill 1/4-inch ventilation holes along the top perimeter of the inner tote and the lid. Drill drainage holes in the bottom of the inner tote.
The Assembly: Place the inner tote inside the outer tote. The outer tote acts as a reservoir to catch excess liquid ("worm tea," a potent liquid fertilizer).
The Substrate: Fill the inner tote halfway with damp, shredded cardboard. It should feel like a wrung-out sponge.
Inoculation: Introduce your Red Wigglers to the bedding. Add a small handful of soil to provide grit for their digestive gizzards, followed by a small portion of food scraps.
Phase 2: The Digital Nervous System
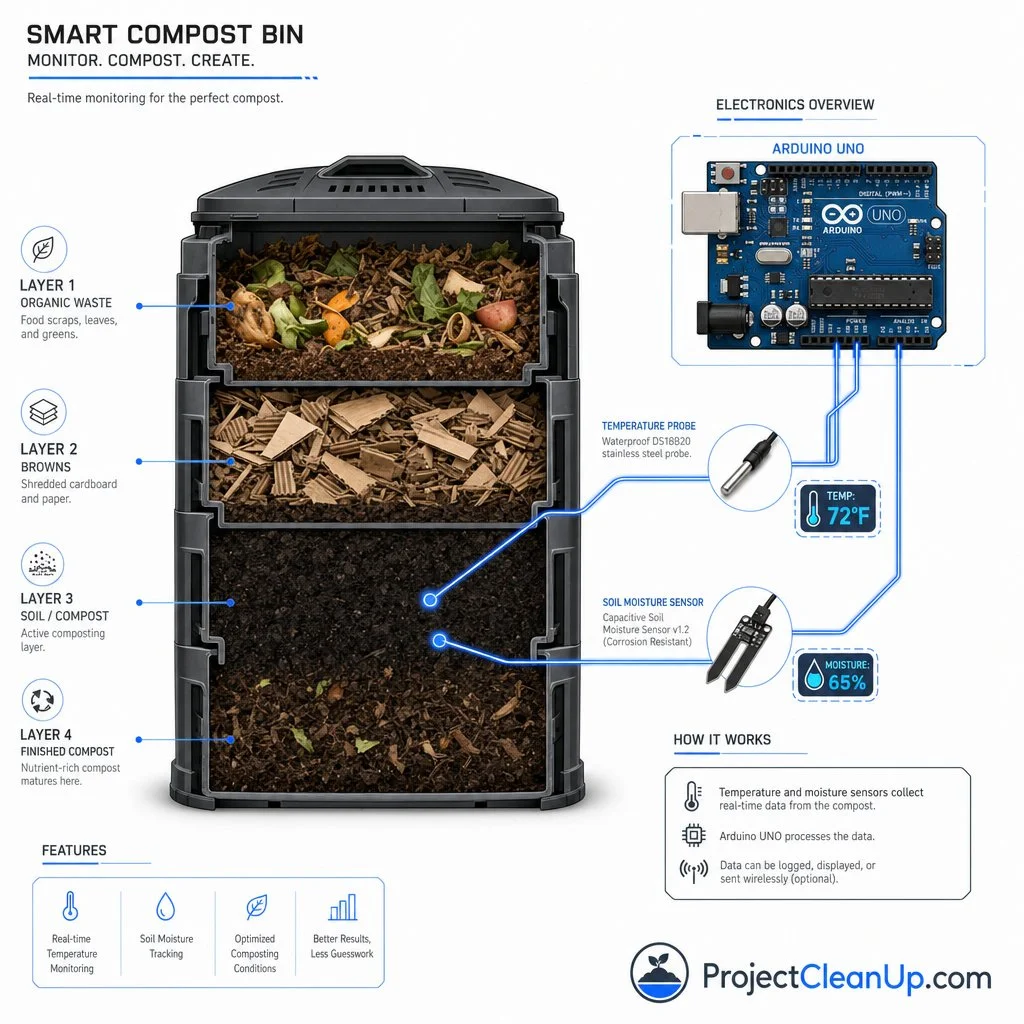
We must wire our sensors to monitor the biological activity without exposing the main board to the damp environment. Mount your Arduino and breadboard to the outside of the tote lid (image for illustration purposes only, not a diagram).
Wire the DS18B20 (Temperature):
Connect the Red wire to Arduino 5V.
Connect the Black wire to Arduino GND.
Connect the Yellow (Data) wire to Arduino Digital Pin 2 (not shown in image).
Crucial: Place a 4.7kΩ resistor between the Data and 5V lines (not shown in image).
Wire the Capacitive Sensor (Moisture):
Connect VCC to Arduino 5V.
Connect GND to Arduino GND.
Connect AOUT (Analog Out) to Arduino Analog Pin A0 (image points to A2).
Deploy the Probes: Drill two small holes in the lid just large enough for the sensor cables. Drop the waterproof temperature probe deep into the center of the bedding (where the thermodynamic activity is highest). Bury the prongs of the capacitive moisture sensor halfway down into the substrate.
Phase 3: The Code
Connect the Arduino to your computer and upload a basic monitoring sketch using the Arduino IDE. You will need to include the OneWire and DallasTemperature libraries.
(A basic logic loop for your code should initialize both sensors in the setup(), and use the loop() function to print the Analog Read from A0 and the temperature request from Pin 2 to the Serial Monitor every 5000 milliseconds).
Once programmed, connect the Arduino to your portable power bank.
System Analysis & Closing the Loop
With your serial monitor running (or an attached LCD screen if you choose to expand the hardware), you now have a real-time window into the thermodynamic health of a biological factory.
How to Execute on the Data:
High Temperature Alert (> 80°F): Your system has too much nitrogen (greens) breaking down too rapidly. Action: Add shredded cardboard (carbon) to slow the reaction, and gently turn the pile to release trapped heat.
Low Moisture Alert (Sensor reads < 400 analog value): The substrate is drying out, threatening the osmotic breathing of the worms. Action: Mist the bin with dechlorinated water and add water-dense foods like melon rinds.
High Moisture Alert: The bin is risking anaerobic fermentation. Action: Add dry, shredded cardboard to absorb excess liquid and ensure the bottom drainage holes are clear.
The Closed Loop Reality: You have successfully built a domestic micro-loop. Kitchen waste (input) is monitored by custom digital hardware (oversight) and converted by enzymes and biological digestion into rich, bio-available worm castings (output). This output is then cycled back into your house plants or garden to grow the next cycle of food. Waste has been entirely engineered out of the equation.